Getting Started

RDM Forms can be installed on any Windows or Linux web server running PHP 7.2 or greater. Consult the following list of permissions and extensions required to guarantee the best possible user experience.

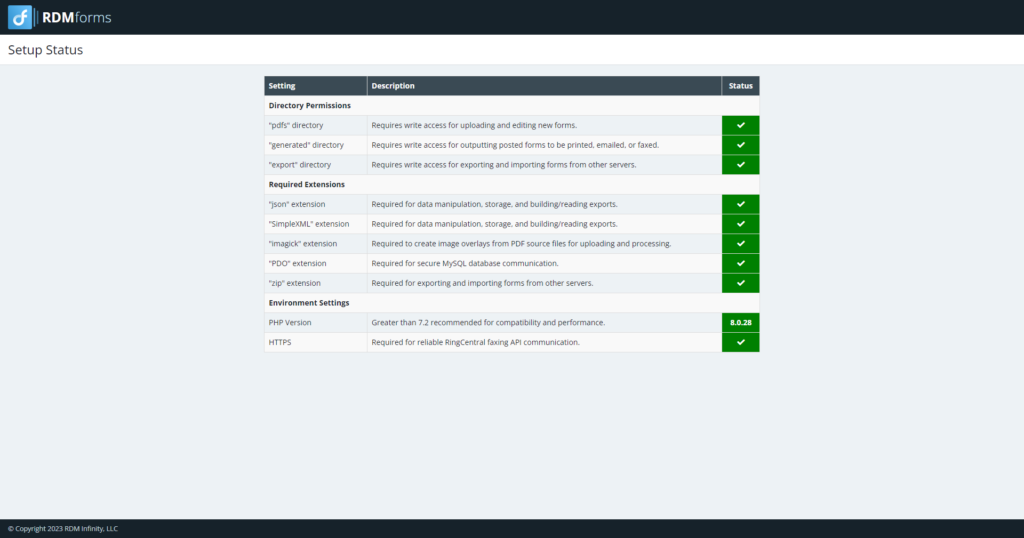
  • Read/write permissions for the following sub-directories
    • pdfs for uploading and editing new forms
    • generated for outputting posted forms to be printed, emailed, or faxed
    • export for exporting and importing forms from other servers and creating backups
  • Installed extensions
    • json for data manipulation, storage, and building/reading exports
    • SimpleXML for data manipulation, storage, and building/reading exports
    • imagick to create image overlays from PDF source files for uploading and processing
    • PDO for secure MySQL database communication
    • zip for exporting and importing forms from other servers
  • Environment settings
    • PHP version greater than 7.2 recommended for compatibility and performance
    • HTTPS required for reliable RingCentral faxing API communication

If you’re unsure of the current standing of your web server permissions and extensions after initially installing or migrating RDM Forms to a new server, you can check the setup status page at [host][installation-path]/setup; eg., https://dev.rdminfinity.com/forms/setup

Creating Templates

RDM Forms uses PDFs as background templates for organizing the contents of your form data. These templates will often include company logos, section headers, and delimited areas for arranging the overlaid content. The size of the uploaded template will also dictate the output size of the generated form for print or other media output types.

To begin a new form, navigate to the default form list at the root path of your installation, and select one of the following creation methods beneath the “Start New Form” header on the right side of the page.

New Form

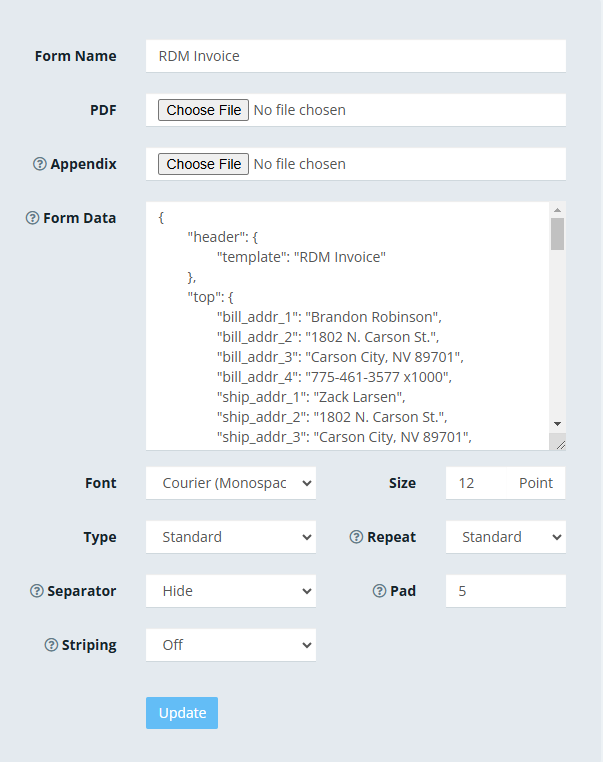
This default method of creating a form has the following inputs

  • Form Name
    This name must be unique in your list of forms and will the name you specify in your posted XML or JSON header when executing a print job.
  • PDF
    The background PDF template on top of which you will overlay your printed contents. This template can be 1 or 2 pages, depending on if your generated print job will require variations to either the first or last page for conditional fields, eg., invoice totals. See the Printing Tabular Data section for more information.
  • Appendix
    Optional static document attachment to accompany the form; eg., terms and conditions page.
  • Form Data
    A sample of the JSON or XML that will be posted, containing the formatted data for your print job.
    See the Form Data section for more information about form data structure and syntax.
  • Font
    Monospace or proportional font
  • Size
    Default font size for overlaid contents
  • Type
    Standard PDF output or ZPL formatted output for Zebra label printers
  • Repeat
    Indicator for whether the first or second page of a 2-page template is used when iterating through multiple lines of tabular data. See the Printing Tabular Data section for more information.

Import

This import method of creating a form takes a single uploaded .rdm file, generated by exporting forms from an RDM Forms server. This will rebuild the template, settings, and tags from the source server, but may lack some of the advanced tag settings if the source and destination servers were not running the same software patch. It is advised to review all forms after importing to ensure that everything is in order.

API POST Create

In addition to printing by posting to the API generate endpoint, an experienced user can take advantage of this same tool to create a new template based on the posted XML or JSON data object by using mode “C”. See the Form Data section for more information.

Note: This feature should be used with caution. Failing to update the delivery mode from “C” to the desired output medium after POST-ing the first time will result in duplicate form templates being created that will need to be removed/managed through the list screen.

Form Data

Printing a form through RDM Forms is accomplished by POST-ing to the generate API endpoint on your server, eg., https://dev.rdminfinity.com/forms/generate/
The raw POST body can be formatted as either XML or JSON.

XML

The XML data object is divided into two main sections; the header and the content fields for data to be overlaid onto your template.

Header

The header section of your XML contains all required and optional parameters that define which template you are printing to and how you are distributing the output. The following is a comprehensive list of available parameters and their function.

  • mode (required)
    The output method of the generated form. Values can be combined for multiple forms of delivery, ie., PE to print and email.

    • P = Print the resulting form
    • E = Email ” “
    • F = Fax ” ” – requires compatible 3rd party faxing service
    • D = Download ” ” – returns base64 encoded PDF
    • C = Create ” ” – generates no output; uses POST body to instantiate a new template
  • template (required)
    The name of the form template to define form settings and overlay contents onto
  • printer (required if mode = P)
    The name of an available network printer to send the form to
  • copies
    The number of copies to be printed
  • printer_tray
    The name of the tray to print from. If missing or blank, the default tray is used
  • filename
    The name of the file copied to the web server; used for static link references
  • email (required if mode = E)
    The recipient email address for the generated form; comma-separated list permitted for multiple email recipients
  • email_subject (required if mode = E)
    The subject of the email sent to all recipients
  • email_body
    Optional body of email; if missing or left blank, will repeat the subject in the email body
  • email_from
    Optional custom sender of email, depending on restrictions within the provided mail relay or SMTP server
  • attachment_name
    Optional name of the file attachment sent with the email; defaults to the id of the generated form
  • fax_number (required if mode = F)
    Fax number of recipient
  • send_time
    Optional future date/time for sending a fax. Preferred formatting is YYYY-MM-DD HH:MM:SS, however most human-readable formats will attempt to parse with expected results
  • zpl_resolution
    ZPL resolution is only relevant for forms printed through Zebra label printers with ZPL set as the form type. If left out of the header, ZPL outputs will default to 300 dpi resolution. If this appears stretched outside of the bounds of your printed label/file in your test print, try setting this header field to 203, which is the second most common Zebra dpi used.

Content Fields

After closing your header block in your XML, the rest of the formatted data is entirely at the discretion of the architect of the form. Anything technically compliant with W3C 5th edition standards can and will function, but it is strongly advised that users take advantage of XMLs strengths by nesting related pieces of data into organized blocks.

This will work:

...
<order_id>12345</order_id>
<bill_addr1>Brandon Robinson</bill_addr1>
<bill_addr2>1802 S. Carson St.</bill_addr2>
<bill_addr3>Carson City, NV 89703</bill_addr3>
<part>ABC-0001</part>
<description>TEST PART FOR FORM DEMO</description>
<qty>3</qty>
<price>60.00</price>
<part>ABC-0002</part>
<description>TEST PART FOR FORM DEMO</description>
<qty>3</qty>
<price>60.00</price>
<part>ABC-0003</part>
<description>TEST PART FOR FORM DEMO</description>
<qty>3</qty>
<price>60.00</price>
...

This is better:

...
<top>
    <order_id>12345</order_id>
    <bill_addr1>Brandon Robinson</bill_addr1>
    <bill_addr2>1802 S. Carson St.</bill_addr2>
    <bill_addr3>Carson City, NV 89703</bill_addr3>
</top>
<lines>
    <line>
        <part>ABC-0001</part>
        <description>TEST PART FOR FORM DEMO</description>
        <qty>3</qty>
        <price>60.00</price>
    </line>
    <line>
        <part>ABC-0001</part>
        <description>TEST PART FOR FORM DEMO</description>
        <qty>3</qty>
        <price>60.00</price>
    </line>
</lines>
...

Advanced Settings

Additional minor formatting and syntax changes can be applied inline with a handful of custom tags and markup rules.

  • Page numbers
    Automatic page numbers can be added to any document by passing in the <page_number> tag and positioning it in your form template. By default, this tag will display a single integer, describing the current page of the document. Customizing this field is possible by adding additional text into the tag and using a ? to be substituted for the current page number. A value supplied with 2 ?s will substitute the second instance with the total number of pages in the completed document. Please see the examples below.

    • <page_number></page_number>

      Result: 1

    • <page_number>Page ?</page_number>

      Result: Page 1

    • <page_number>Page ? of ?</page_number>

      Result: Page 1 of 3

  • Bold Single Line (only applicable for repeating rows)
    To bold a single instance of a tag in a list of repeating tags, surround the text with two colons before and after. Eg.,

    <total>::$13.37</total>
  • Center Single Line (only applicable for repeating rows)
    To center-align a single instance of a tag in a list of repeating tags, surround the text with double parentheses. Eg.,

    <total>(($13.37))</total>
  • Line Breaks
    To add additional line breaks within a single tag, use the newline escape sequence: \n. To ensure that new lines are acknowledged, always terminate the tag with a valid character, even a blank space, on the last new line.

    <tag>Add a blank line after this\n </tag>

JSON

The JSON data object is divided into the same two main sections; the header and the content fields for data to be overlaid onto your template. All of the same header tags defined above have a corresponding key in your JSON object header.

Template Layout

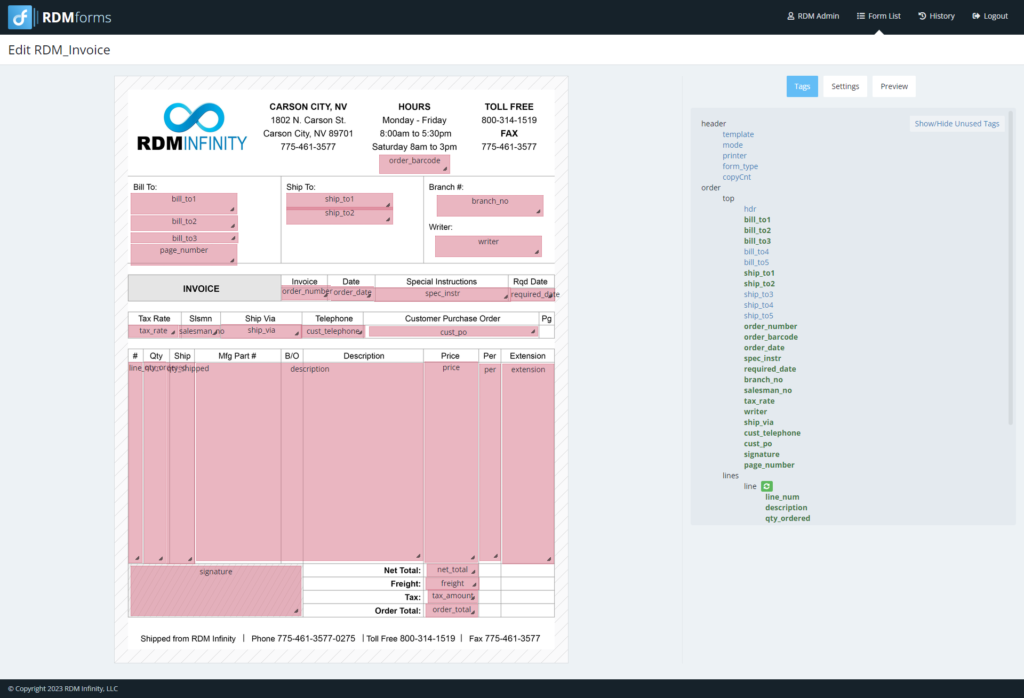
After creating a form by uploading a PDF and providing the XML or JSON data, you will arrive at the edit screen to begin organizing the layout of content on generated forms. Usability of this screen is divided into three sections.

Tags

If valid XML or JSON has been provided, the tags section of the edit screen will display a formatted and nested list of all available tags to add to your form template. Tag names appear in three possible colors.

  1. Black tags are determined by the syntax parser to be containers of other tags
  2. Blue tags are data elements that are not yet on the current template being edited
  3. Green, bolded tags are already on the existing template but can still be edited

If you do not see the tag you are looking for, make sure it is formatted properly in the provided XML or JSON object in your form settings.

Adding Tags to a Form Template

Click on a blue tag and follow the prompt in the context menu that pops up to add that tag to your form template. Newly added tags will appear in the top-center of the template by default. You may need to scroll back to the top of the template to see the green content block that represents this selected tag.

Reposition the tag in one of three ways.

  1. Drag the tag to a new location on the form while the box is selected, green.
  2. Use the arrow keys on your keyboard to reposition the tag while the box is selected, green. Shift + an arrow key will move the block by 10x the distance in the provided direction, within the bounds of the form template.
  3. Type the desired position values in the tag edit context box using the “From Left” and “From Top” text input fields.

Resize the tag in one of three ways.

  1. Click and drag the bottom, right, or bottom-right edge of the selected tag block.
  2. Use the arrow keys + the control key on your keyboard to resize the selected tag block. Shift + control + arrow key will resize the block by 10x the value.
  3. Type the desired width and height in the tag edit context box using the “Width” and “Height” text input fields.

Editing Tags

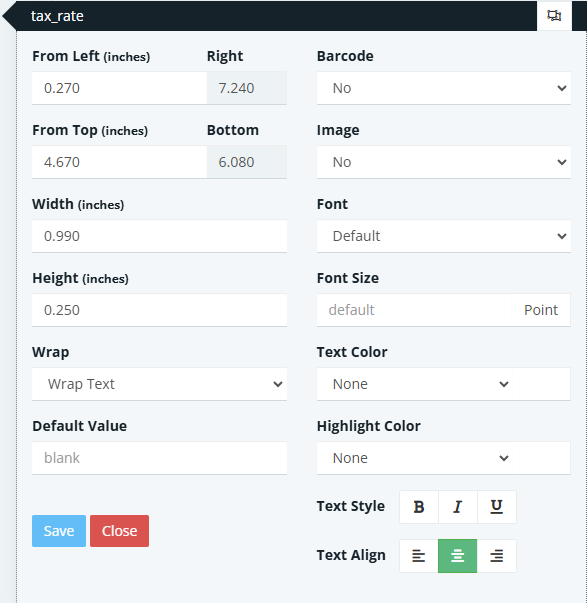
Click on the positioned block in the form template or the tag name in the list to edit the formatting details of any tag in a form template. The tag block will turn green when selected and a context menu will pop up containing the formatting instructions for the tag.

  • From Left
    Represents, in inches, the distance of the tag from the left edge of the document.
    Anything positioned outside the boundary of the output medium, such as a printer or fax machine, will be cut off.
  • From Top
    Represents, in inches, the distance of the tag from the top edge of the document.
  • Right / Bottom
    These un-editable fields provide you the calculated distance from the right and bottom edges of the form template, based on the size and current position.
  • Width
    Represents, in inches, the width of the tag.
  • Height
    Represents, in inches, the height of the tag.
  • Wrap
    Contains three options for handling text that exceeds the width of its container.

    • Wrap Text will continue on the next line. If it is a single tag (not recurring/tabular), the line height is determined by the height of the container. Text will wrap outside of this height.
    • Truncate Text will crop off the information being displayed when it reaches the boundary of the container.
    • Shrink to Fit will alter the font scaling to horizontally resize the text being displayed to fit within the bounds of the container.
  • Barcode
    By default, text is text, but this option provides optional barcode types to translate what is displayed. Choose the barcode type that accurately represents the content of the field.
  • Image Link
    If set to yes, RDM Forms will treat the text provided as a web link to download and display an image resource instead of plain text. Images will resize to fill the bounds of the provided container block for the tag.
  • Font Size
    The point size of the text in the field.
  • Highlight Color
    An optional background color for the text displayed. Choosing black will change the text color to white by default.
  • Text Style
    Optional bold, italics, underline, or any combination thereof.
  • Text Align
    Left, center, and right-alignment options of the text within the provided container block on the page.
  • Duplicate Tag
    In the upper right corner of the tag context menu there is a button to duplicate the selected tag. This can be useful for presenting the same information in multiple places in a form, or for displaying a barcode and adding the written code beneath it.

Printing Tabular Data

Tabular data, or recurring tags, are adjacent blocks of tags that will auto-align to create tables of information, using the repeated tags provided to format aligned rows. If a data sample includes containers of repeating tags, it will be represented by a green repeating arrow icon.

Tags nested beneath the parent shown with this icon will be treated as tabular data. Because XML lacks the ability to recognize a single value as a potential array of many values, this can be forced by adding the attribute “repeating” to the parent. For example

<lines repeating="true">
    <line>
        <part_number>ABC123</part_number>
        <quantity>1</quantity>
    </line>
    ...

The repeat value in the template form Settings, which defaults to “Standard” determined how a multipage document is handled when the tag layout differs.

  • Standard page repeating logic will use the tag layout from the first page of a 2-page template file for however many pages of the generated document are required until all repeating tags will fit on the last page.
  • Last page repeating logic will use the tag layout from the first page only a single time, then the page 2 template will be used for all subsequent pages of the generated document until the list of repeating lines has been exhausted.
Settings

The settings available for a form template mirror the initial New Form data provided when creating the template. Edit any of these settings to update global values for this form.

Preview

A preview can be generated at any time using the default template tag layout or any custom sample of a print job pasted into the available text area. In addition to displaying the provided data, the preview will consider the form name defined in the header, so the provided XML or JSON data must be accurate.

Processed Form History

A full log of processed templates is available for review by selecting History from the main menu in the upper-right corner. The resulting list can be filtered by the following criteria.

  • Form Name
  • Keywords (within the printed content)
  • Start Date
  • End Date

The resulting list offers quick links from each entry to preview the posted data, view the generated form, and edit the source template for the form.

Note: If a form fails to process successfully because it does not reach the server or because the POSTed data object was invalid, it will not appear in the processed history.